Introduction
Overview
Teaching: 5 min
Exercises: 0 minQuestions
So you want to run python code on a cluster?
Objectives
Learn about some of the sections of the course
You may have learned to program Python through Jupyter notebooks, which provides an excellent playground for learning Python.
We will now look at running Python code on high performance computing (HPC) clusters, which involves learning some new techniques for running Python code, often outside of Jupyter notebooks.
The expectations of the students is that they have previously taken:
- an introduction to bash shell;
- an introduction to running jobs;
- an introduction to the Python programming library.
Today we’ll look at:
- Why run on a cluster?
- Virtual environments and installing packages;
- Submitting jobs that run Python code;
- Storage choices and the impact on performance;
- Array jobs and methods to work with them;
- Interactive jobs;
- Connecting to HPC JupyterHubs.
At this point, your instructor should have given you access to a training cluster, and you should now be logged in.
Key Points
Yes, you can run python code on a cluster
Why run Python on a cluster?
Overview
Teaching: 5 min
Exercises: 0 minQuestions
When should I run Python on an cluster?
Objectives
Understand when running on a cluster is worth it, and when it isn’t
Some ways to run Python
- You can use cloud-based Jupyter notebooks
- You can run Python on your own machine and either run scripts or Jupyter notebooks
- You could run Python on an HPC cluster
When shouldn’t you run on a cluster?
- When you are interested in running very few, fairly short jobs. The overhead and effort of running on a cluster may not be work it if these jobs require modest computational resources
- When you don’t feel comfortable using (or learning) Linux based tools (although stick around: because many HPC clusters provide access to a JupyterHub for interactive work).
Times when running on a cluster makes sense
- When you have a program that takes a really long time to complete (e.g., days)
- When you need to run the same program dozens or hundreds of times, with different parameters (e.g., a parameter sweep)
- You are reaching the limit of what either your laptop or cloud-based tools will allow in terms of computational power, e.g., maybe your program can use multiple CPUs, or can be accellerated with an expensive GPU, or maybe it needs more memory that what you currently have access to.
- You need access to more storage than is available to you on your laptop or cloud-based solutions.
Key Points
Make sure the effort needed to run on a cluster isn’t too high
Loading Python and Virtual Environments
Overview
Teaching: 30 min
Exercises: 10 minQuestions
How do I run python on the cluster?
How do I install python packages?
Objectives
Be able to load a specific version of Python
Be able to create and activate virtual environments
Be able to install packages in a virtual environment
If you’ve learned python using Jupyter notebooks, you may have never run python on the
command line or seen a virtual environment before. Quite often packages like pandas and
numpy are “just there” when we use online notebook services like Colab.
On a cluster, we have many options for how we want to run Python. We have a system called “modules” (or “environment modules”, or it’s proper name “lmod”) that help us choose which Python version we want to use. On a cluster, it’s our responsibility to ensure that we have the packages we need to run our Python code.
This is what we will cover in this section.
Loading Python
When you first log into an HPC cluster, you will have python available to you, but it’s rarely the version you will want.
$ python --version
Python 3.11.4
Unlike your home computer, the Alliance clusters use a modular software stack that allows you to
choose what version of python you would like to use. To use this stack, most actions are initiated
by the module command. The module load command, followed by the name of the software you want
(and possibly the version) gives you access to that software. For example, we can load Python 3.13
with:
module load python/3.13
To find out the available version of python:
module spider python
Note: the module load command doesn’t do any permanent changes to your account, and the next time you log in things will be the same as before. You will need to load the python module again if you want to use it.
Python Packages
Once python is loaded, we need to ensure that we have the packages we need to run our python code.
We can see if we have the pandas package installed by starting up the
Python console:
python
Now try to import pandas:
import pandas
You likely got an error saying that pandas couldn’t be found
(Ctrl-D to exit the console). It’s our responsibility to get it.
Virtual environments provide a nice solution to keeping the packages you
need for any particular program isolated from your account and the system
install of python. If you have two different projects that use different
Python versions and different dependencies, no problem: you can
create two different virtual environments that you can turn on of off as
needed. The tool pip is used to install packages that don’t come
with the main Python install (pip stands for “pip installs packages”).
Note: on most clusters, the Anaconda distribution of Python is not supported (nor does it work). If you would like to know why, check out this document:
https://docs.alliancecan.ca/wiki/Anaconda/en#Do_not_install_Anaconda_on_our_clusters
You create a virtualenvironment with:
virtualenv --no-download venv
(Here venv is a name for the virtual environment, and will be created on disk as a folder.)
To use a virtual environment, you need to activate it. This is done with
source venv/bin/activate
Notice how your command prompt now has the name of the virtual environment. We can now use pip to start downloading packages. The first thing we should do is to upgrade pip.
pip install --upgrade pip
Later versions of pip do a better job of handling package requirements and dependencies,
so this is why this step is important.
Some important considerations
The above is fine for your own computer, but in general:
- python packages from PyPI aren’t optimized for the cluster environment. They might be missing parallelization options, or may have been built without vectorization or other optimization flags.
- worker nodes on Alliance clusters almost never have access to the internet to reach PyPI.
For this reason, the Alliance has it’s own wheelhouse that is accessible to all
cluster nodes and has mostly wheels that were built for clusters. To use this instead of
PyPI, we can use the --no-index flag for pip, e.g.,
pip install --no-index --upgrade pip
pip install --no-index pandas
If you neglect to include --no-index when installing with pip you can run into
real problems where pip tries to access PyPI but can’t due to lack of internet
access. Your install command might hang forever without completing.
Now start up the Python console and try import pandas. Did it work?
To see all of the wheels that are in the Alliance wheelhouse, visit this page: https://docs.alliancecan.ca/wiki/Available_Python_wheels
Please note that if there is a python package that you need that you find is not in the Alliance wheelhouse, you can contact support to request that it be added: support@tech.alliancecan.ca.
If the missing package is “pure python”, there is also a chance that you can download a wheel from PyPI (on a login node) and install it directly into your virual environment from your account.
A warning
If you don’t have a virtual environment enabled, pip will attempt to install packages so they
are available to your entire account. This almost always leads to problems, so it is recommended that
you always have a virtual environment activated when you install packages with pip.
If you do make the mistake and install in your account, not in a virtual environment,
you can usually find the software installed in the .local folder in your home.
There are some environment variables that you can use to prevent this (Google for
PYTHONNOUSERSITE or PIP_REQUIRE_VIRTUALENV if you are interested).
pip and versions
You’ll notice that when we ran pip install --no-index pandas,
we didn’t specify a version.
If we want to install a specific version of a package we can do so by using the package name, double equals signs, and the version number. By sure to keep all of this inside of quotation marks (I prefer single quotes):
pip install --no-index 'flask==3.0.1'
Checking which packages are installed
This is done with the pip freeze command.
pip freeze
numpy==1.25.2+computecanada
pandas==2.1.0+computecanada
python-dateutil==2.8.2+computecanada
pytz==2023.3.post1+computecanada
six==1.16.0+computecanada
tzdata==2023.3+computecanada
Repeatability through requirements
Sometimes you want to ensure that you use the same versions of your packages each time you run your python code, on whatever cluster we are running on.
We can use the output from pip freeze and send the output to a file
(the convention is to call this file requirements.txt, but the file could
be named anything you want):
pip freeze > requirements.txt
Now the next time we create a virtual environment, we can use this file
to populate the packages with the -r flag to pip.
pip install --no-index -r requirements.txt
Deactivating a virtual environment
When you are done using a virtual environment, or you want to activate a different one, run
deactivate
Notice how your command prompt changes.
Note: you can’t have more than one virtual environment active at a time.
requirements.txt example
Let’s create a second virtual environment called venv2:
module load python/3.13
virtualenv --no-download venv2
source venv2/bin/activate
pip install --upgrade --no-index pip
pip install --no-index -r requirements.txt

# check if it works

deactivate
scipy-stack: An alternative to a virtual environment
If you are using some common data science packages, there is a module in the Alliance
software stack that contains many of them: scipy-stack.
We can load the scipy-stack as follows:
module load python/3.13
module load scipy-stack
As of this writing, the version of scipy-stack that gets loaded is 2025a.
You can be explicit about this:
module load python/3.13
module load scipy-stack/2025a
If you would like to know which packages are loaded, check out module spider scipy-stack/2025a
or do a pip freeze (although you will also see some packages that come with the python module).
Unloading a module
One you’ve deactivated a virtual environment, you might decide you want to work with a different version of Python. You can unload the Python module with:
module unload python/3.13
Note that the following also works:
module unload python
Sometimes you realize that you want to reset all of the software modules back to the defaults. One way to do this is to log out and back into the cluster. More efficient though:
module reset
Your turn …
Creating virtual environments
Now that we have a clean setup (virtual environments are deactivated and modules are reset), try the following on your own:
- Load Python 3.12
- Create a virtual environment and activate it (careful to choose a new name or work in a new directory, since we have already used
venvandvenv2)- Upgrade
pip- Install the packages
daskanddistributed(version2024.11.2).- Create a requirements file (e.g.,
requirements2.txt).- Deactivate your virtual environment.
- Create a second virtual environment (and activate it!) and use your requirements file to populate it.
Note: Each previous step should be done to do the next step:
Solution
# First virtual environment
module load python/3.12
virtualenv --no-download venv3
source venv3/bin/activate
pip install --no-index --upgrade pip
pip install --no-index dask 'distributed==2024.11.2'
pip freeze > requirements2.txt
deactivate

# Second virtual environment
module load python/3.12
virtualenv --no-download venv4
source venv4/bin/activate
pip install --no-index --upgrade pip
pip install --no-index -r requirements2.txt
Key Points
Python is loaded on the cluster through modules
Virtual environments store a version of python and some packages
Package requirements ensure consistency for versions
Running jobs
Overview
Teaching: 30 min
Exercises: 10 minQuestions
How do I submit jobs that run python code?
How do I ensure that my python job has the packages it needs?
How do I get better input/output performance?
How do I use a GPU with my code?
Objectives
Be able to submit and run jobs that run python code
Be able to create virtual environments to install packages in a job
Create a virtual environment on local disk
Run a code on a GPU
Hello world job
Let’s write a short python program hello.py that says “Hello” from the computer it is run on.
import subprocess
print("Hello from ...")
subprocess.run("hostname")
We can write a bash script hello.sh that runs this program:
#!/bin/bash

module load python/3.13

python hello.py
You can give it a try on the command line:
bash hello.sh
Now it turns out that you could also submit this script as a batch job to Slurm:
sbatch hello.sh
The queue
You can check your jobs that are in the queue with:
squeue -u $USER
On the regular Alliance clusters, there is a shorthand command:
sq
Only queued (pending) and running jobs will be shown, so if your job has finished running you won’t see it in the queue
To see all of the jobs in the queue, you can run squeue.
Output
Check out the output file (something that looks something like slurm-57.out) to see what
happened with your job. Hopefully such a file exists and it has a hostname in the output.
But you really shouldn’t submit jobs this way …
When you submit a job that way, the scheduler gives your job some default computational resources. The defaults are pretty wimpy however, and it’s ofter better to tell the scheduler exactly what you want. Common defaults are 1 hour for run time, and 256MB for each CPU core.
We can modify our script to put in some comments, but these comments (all starting with #SBATCH)
instruct the scheduler what resources we want for our job:
#!/bin/bash

#SBATCH --nodes=1
#SBATCH --tasks-per-node=1
#SBATCH --cpus-per-task=1
#SBATCH --mem-per-cpu=1000M
#SBATCH --time=00:10:00

module load python/3.13

python hello.py
Of note, the memory is requested by core (we only ask for one core though), since
this is often a good way to scale up a program for later. The M stands for Megabytes.
Why so many Megabytes? (When Gigabytes exist as a thing)
The scheduler often reserves some memory for each core for use by the operating system when it schedules jobs. If you ask for all of the memory for a core, the scheduler needs a little bit of memory from somewhere else (another core), and as a result your priority will be impacted as if you used an additional core. So if you know that a system has 4 Gigabytes of RAM per core, then it’s better to ask the scheduler for 4000M (Megabytes) than for 4G (Gigabytes). A Gigabyte is actually 1024 Megabytes, and the difference in memory can be used by Slurm to service operating requests.
We can submit this job again with sbatch hello.sh. The output won’t change in our case, but
being specific with your resource requirements is important for jobs that do serious work.
Accounting …
We have glossed over the fact that there is an “account” being used for deciding the priority of
your job. In the case of the training cluster, everybody has one account def-sponsor00.
In real life situtations, it’s quite possible that you might have access to more than one account
on a cluster (e.g., def-sponsor00 and rrg-sponsor00). In which case you’ll need to specify
which account to use either in the script, or on the commandline. (I often prefer the later method).
In the script, add the line:
#SBATCH --account=def-sponsor00
On the commandline, submit with the following command:
sbatch --account=def-sponsor00 hello.sh
The speed of storage matters
Most cluster users will know the three main filesystems on a cluster:
homescratchproject
Each of these filesystems are on disk that is connected to the computers you are using
over a network. We can typically expect that scratch is faster than project, and
that project is faster than home.
But in general, networked disk is slower than local disk (when the disk is connected to the computer you are using), but in order for all of the computers in the cluster to access these filesystems, a network needs to be involved, as do other services like metadata servers to support the parallel filesystem.
The situation is worse than this. Unlike the disk in your laptop, on the cluster there might be hundreds of users all using the same filesystem at the same time. This makes the disk performance issue even worse. Some users that are running on a cluster for the first time might be puzzled why they are getting much worse performance than on their own laptops.
Performance issues are particularly noticable in situations where many files are read/written to. It is better to do a few big writes to a few files than it is to do many little writes to a lot of files.
The Alliance clusters have a solution for this: reserving a piece of local disk on each cluster
compute node for fast Input/Output operations. When using the Slurm scheduler, this disk can
be accessed through an environment variable called $SLURM_TMPDIR.
The good:
- Using
$SLURM_TMPDIRcan greatly speed up your calculations that involve a lot of reading/writing to disk. - While
$SLURM_TMPDIRis physically restricted in size, it is often large enough for most purposes, and there are no quotas involved (for example, on the shared filesystems there are quotas that restrict the number of files that can be created).
The bad:
$SLURM_TMPDIRonly exists while you are running a job. It disappears after the job is done and all of the files are deleted. It is thus very important that you copy in and copy out any files you need or create during the running of the job before the job ends. This includes the situation when you have an error that kills your job: your files on$SLURM_TMPDIRwill vanish, which makes it difficult to debug things.$SLURM_TMPDIRis only on the computer you are running on, and there isn’t access to it over the network. So if your job involves multiple computers, it’s likely that$SLURM_TMPDIRwon’t be a good fit (there are cases where you can make things work though).
If your job is processing a collection of many files (e.g., a machine learning training set). it’s recommended that you keep the files in an archive (zip, tar, … i.e., a single big file), then transfer it to local disk during your job and extract the many files there.
Virtual environments are a collection of many files …
When you assemble a virtual environment, you are usually creating a large colletion of Python files.
Try this with one of your virtual environments:
# Count the files in a virtual environment
find venv | wc -l
Because of this, it is highly recommended that you create your virtual environments on local disk
This is what it looks like:
#!/bin/bash

#SBATCH --nodes=1
#SBATCH --tasks-per-node=1
#SBATCH --cpus-per-task=1
#SBATCH --mem-per-cpu=1000M
#SBATCH --time=00:10:00

module load python/3.11

virtualenv --no-download $SLURM_TMPDIR/venv
source $SLURM_TMPDIR/venv/bin/activate
pip install --no-index pandas
# Install any other packages you need here

python hello.py
Note that compute nodes don’t have access to the internet to grab
packages from PyPI, so it’s really important to add the --no-index
flag to pip.
An exercise using GPUs (or possibly a demo, depending on the training cluster …)
GPUs (Graphical Processing Units) can speed up a number of different kinds of codes in a number of different domains (Machine Learning being a hot example right now).
Your code must be especially written to use the GPU, usually using a library that does most of the low-level work.
Most programs and libraries that use one or more GPUs on the Alliance clusters use a special library called CUDA (written by NVIDIA) to interface with the GPU card.
There is a Python package called Numba (rhymes with “rhumba”, sounds kinda like “number”) that can use a GPU card.
To run a GPU job, you basically need three things:
-
You need to request a GPU from the scheduler.
You may want to request a specific type of GPU, but the most generic way to make such a request is to add a line to your batch script that looks like:
#SBATCH --gres=gpu:1This tells the scheduler “give me one GPU, I don’t care what kind”. If the type of GPU is of concern to you, check out the options on the Alliance GPU page: https://docs.alliancecan.ca/wiki/Using_GPUs_with_Slurm
Also, many clusters have options to use a partial GPU for your job, through a technology called MIG (Multi-Instance GPU). This is often a good choice for jobs that may not exhaust the entire memory of the GPU. It also costs less with respect to how the scheduler works. More about this here:
-
You need to load the CUDA modules.
Just like with loading the Python module, we can load CUDA with:
module load cudaThis will allow your software to find the CUDA libraries. You can run
module spider cudato find out what versions of CUDA are available. -
You need to load a package in your virtual environment that uses the GPU.
In this case, we will use
pipto installnumba(version0.57.0) in our virtual environment. -
Your Python script must be written to use such a library.
Writing code for the GPU is beyond the scope of this course so we will download one. You can get the script by running:
wget https://raw.githubusercontent.com/ualberta-rcg/python-cluster/gh-pages/files/primes_gpu.pyThe script
primes.pywe’ve downloaded computes all of the prime numbers that are less than 5,000,000.Also get this version that doesn’t use a GPU (uses a CPU only) to calculate the prime numbers less than 1,000,000:
wget https://raw.githubusercontent.com/ualberta-rcg/python-cluster/gh-pages/files/primes_cpu.py
Putting it together …
Let’s put things together to write a job script that runs this GPU code. Some features of this script:
- Ask Slurm for a GPU (above)
- We don’t know how long this is going to run, so it’s often useful to air on the side of caution: ask for 30 minutes from the scheduler.
- Load both the
pythonandcudamodules.- Create a virtual environment on local disk of the node you are running on, activate it, upgrade
pip, and usepipto installnumba(version doesn’t really matter, but well use0.61.2).- Run the
primes_gpu.pypython script- Record the job id from
squeue- Write a second submission script and repeat this process to run the CPU version of the script (
primes_cpu.py). Don’t ask for a GPU this time, you won’t need it and you will end up waiting a long time in the queue. You also don’t need to load the CUDA module (it really doesn’t matter though).- Also record the job id for this run.
When the jobs are done, check the output files, and run
seff [jobid]to see some performance information for each jobSolution
submit_gpu.sh#!/bin/bash #SBATCH --nodes=1 #SBATCH --tasks-per-node=1 #SBATCH --cpus-per-task=1 #SBATCH --mem-per-cpu=1000M #SBATCH --time=00:30:00 #SBATCH --gres=gpu:1 module load python/3.13 cuda/12 virtualenv --no-download $SLURM_TMPDIR/venv source $SLURM_TMPDIR/venv/bin/activate pip install --no-index --upgrade pip pip install --no-index numba==0.61.2 python primes_gpu.py
submit_cpu.sh#!/bin/bash #SBATCH --nodes=1 #SBATCH --tasks-per-node=1 #SBATCH --cpus-per-task=1 #SBATCH --mem-per-cpu=1000M #SBATCH --time=00:30:00 module load python/3.13 virtualenv --no-download $SLURM_TMPDIR/venv source $SLURM_TMPDIR/venv/bin/activate pip install --no-index --upgrade pip pip install --no-index numba==0.61.2 python primes_cpu.py
Key Points
Submit jobs to run long-running or computationally intensive Python code
Create virtual environments and install packages from the Alliance wheelhouse
Working with local disk in a job can provide performance benefits
You can use the scheduler to ask for a GPU to run code on
Arrays
Overview
Teaching: 30 min
Exercises: 10 minQuestions
How do I submit many similar jobs?
Objectives
Be able to submit and run array jobs that run python code
Many similar jobs
Writing job scripts isn’t exactly the most rewarding experience. This is particularly true when you are writing many almost identical job scripts.
Luckily Slurm has a solution for this: job arrays.
How it works:
- You specify in your script an array of integer indices that you want to use to parameterize some
sub-jobs.
Some examples:
#SBATCH --array=0-7
#SBATCH --array=1,3,5,7
#SBATCH --array=1-7:2
#SBATCH --array=1-100%10
The second and third examples are the same (the
:2means “every second number”).The last example means “run at most 10 of them at a given time”
-
Your script will run one time for each index specified. Each time it runs, the script will have access to the environment variable
$SLURM_ARRAY_TASK_ID, which will have the value of the index for this specific run.In the second example above, four sub-jobs are submitted into the queue, one will run with
$SLURM_ARRAY_TASK_IDequal to1, another with$SLURM_ARRAY_TASK_IDequal to3, and so on. - Each sub-job will appear separately in the queue, each with a separate log file.
Job arrays are an excellent way to exploit a kind of parallelism without having to make your serial program parallel: since multiple jobs can run at the same time, the net effect is that your multiple serial jobs are running in parallel.
Here is a very basic example of how arrays work, try submitting it:
array-basic.sh
#SBATCH --array=1,4,7
#SBATCH --time=00:10:00

echo "I am the job with array task ID $SLURM_ARRAY_TASK_ID"
sleep 60
Then run: sbatch array-basic.sh
(Note: there is actually a small error in the above script – when you submit the script you will see it. Try to correct it.)
How do I use $SLURM_ARRAY_TASK_ID with my python program?
There are a number of ways.
-
Read the
$SLURM_ARRAY_TASK_IDfrom the environment.The python os module will help with this:
array-env.pyimport os my_array_id = os.environ['SLURM_ARRAY_TASK_ID'] print('My array task id is', my_array_id, "from the environment")array-env.sh#!/bin/bash #SBATCH --array=1,4,7 #SBATCH --time=00:10:00 module load python/3.13 python array-env.pyThen run:
sbatch array-env.shThe drawback here is that now your python script can’t be used outside of a job.
-
Pass the
$SLURM_ARRAY_TASK_IDas a commandline argument to the program.Elegent command line argument parsing can be done with the Python
argparsemodule, but here we will just use the more simplesys.argv:array-arg.pyimport sys my_array_id = sys.argv[1] print('My array task id is', my_array_id, "from an argument")array-arg.sh#!/bin/bash #SBATCH --array=1,4,7 #SBATCH --time=00:10:00 module load python/3.13 python array-arg.py $SLURM_ARRAY_TASK_IDThen run:
sbatch array-arg.shNow this python script can be used outside of a job.
-
If you don’t actually want numbers, you might consider a bash array
The python script is the same as previously, but now we can do for the submission script
array-bash-array.sh#!/bin/bash #SBATCH --array=0-2 #SBATCH --time=00:10:00 module load python/3.13 things=('dogs' 'cats' 'other things') thing=${things[$SLURM_ARRAY_TASK_ID]} python array-arg.py "$thing"(Watch the quotes above around the argument!)
Then run:
sbatch array-bash-array.sh -
There are many other examples of ways to translate array task ids to meaningful inputs
Check out the job array wiki page: https://docs.alliancecan.ca/wiki/Job_arrays
Putting it together …
Let’s write a job script for an array job that does some machine learning, using different models on the classic Titanic data set
First we download a script and some data:
wget https://raw.githubusercontent.com/ualberta-rcg/python-cluster/gh-pages/files/titanic.py
wget https://raw.githubusercontent.com/ualberta-rcg/python-cluster/gh-pages/files/titanic-train.csv
The
titanic.pygives an example of usingargparsefor working with commandline arguments. In particular, it has a required parameter--modelto select the model to use. The available options aredecision_tree,random_forestandstate_vector_machine., So for example, we might chose to run the program with:python titanic.py --model random_forestThis will train a model with the data (reserving 1/3 of the data for testing), and report on the accuracy, precision and recall of the model.
Your task is to write an array job that will run all three different models. It should include
- Loading a python module
- Create (and activate!) a virtual environment on local disk (
$SLURM_TMPDIR)- Upgrade
pipand use it to installpandas,numpy, andscikit-learn.- Add an
#SBATCHdirective for using a job array- use a bash array to translate numbers to model names.
- run the python script:
python titanic.py ...(Tip: copy/paste from the previous example, and the one in the ‘jobs’ section of this workshop.)
When crafted correctly, a single slurm script will run the
titanic.pypython script with the three different models in separate sub jobs, i.e.,:
python titanic.py --model decision_treepython titanic.py --model random_forestpython titanic.py --model state_vector_machineThe jobs run pretty quick, but you might be able to catch them in
squeue. Useseffto check out the job performance of each sub-job in the array.Solution
submit-titanic.sh#!/bin/bash #SBATCH --array=0-2 #SBATCH --time=00:10:00 module load python/3.13 models=('decision_tree' 'random_forest' 'state_vector_machine') virtualenv --no-download $SLURM_TMPDIR/venv source $SLURM_TMPDIR/venv/bin/activate pip install --no-index --upgrade pip pip install --no-index pandas numpy scikit-learn model=${models[$SLURM_ARRAY_TASK_ID]} python titanic.py --model "$model"
Key Points
Array jobs allow you to run several jobs with a single job script
Running interactive jobs
Overview
Teaching: 30 min
Exercises: 0 minQuestions
How do I run jobs that allow me to interact with my python code?
How do I debug code on an interactive node?
Objectives
Be able to start interactive jobs and run python code
Batch jobs are great, but …
Batch jobs are great, but you need to implement them correctly before they will work.
It’s quite unsatisfying having to run a job just to find out if it will work or not. This is particularly true if your jobs are experiencing long wait times in the scheduler queue, just to have a job fail in a few seconds or minutes.
Interactive jobs let you have a better turnaround time while figuring your job out – the scheduler gives you the resources you want, and connects you to a terminal session on the compute node to try things out.
They also give an opportunity to run monitoring tools to see how your program is faring.
Use salloc instead of sbatch
Let’s take the CPU prime example from an earlier lesson (the GPU example would be great to try, but we don’t have enough GPUs to ensure a reasonable waiting time for all students).
submit-cpu.sh
#!/bin/bash

#SBATCH --nodes=1
#SBATCH --tasks-per-node=1
#SBATCH --cpus-per-task=1
#SBATCH --mem-per-cpu=1000M
#SBATCH --time=00:30:00

module load python/3.13

virtualenv --no-download $SLURM_TMPDIR/venv
source $SLURM_TMPDIR/venv/bin/activate

pip install --no-index --upgrade pip
pip install --no-index numba

python primes_cpu.py
In this case we would like to get the exact some resources from the scheduler as we did
from the batch job, so we take the values from the “#SBATCH” lines and give them
to salloc instead:
salloc --nodes=1 --cpus-per-task=1 --mem-per-cpu=1000M --time=00:30:00
Now we wait … the command will appear to hang, but it’s just waiting to get the resources from the scheduler. We will eventually get a command prompt.
From here we can try out the first few lines from the SLURM script, one at a time:
module load python/3.13
virtualenv --no-download $SLURM_TMPDIR/venv
source $SLURM_TMPDIR/venv/bin/activate
pip install --no-index --upgrade pip
pip install --no-index numba
Now we get to the part where the prime detection script is run, the one that does the work.
We will force this into the background using & at the end of the line:
python primes_cpu.py &
(Be careful putting the & in your batch scripts: the scheduler often thinks your code
has finished running and the scheduler kills your job.)
We can “see” the program running by using the jobs command.
If we want to bring the program to the forefront, get the job id and: ‘fg [job id] (e.g., probably fg 1`).
We can suspend the program by pressing Ctrl-Z. This stops the program from running, but doesn’t kill it.
Check jobs again to see it and get the job id.
Finally bg [job id] (e.g., probably bg 1) runs the program in the background.
While the program is running in the background, run the htop command (and htop -u).
If trying with a GPU node, add --gres=gpu:1 to you salloc, load the cuda module (module load cuda),
and check out what the gpu is doing with nvidia-smi.
Key Points
Interactive jobs are a useful way to set up or solve issues with python code on a cluster
Running a notebook in a JupyterHub
Overview
Teaching: 20 min
Exercises: 0 minQuestions
How do I run a notebook in a JupyterHub?
How do I load specific software in a JupyterHub notebook
Objectives
Be able to run a notebook in a JupyterHub
Jupyter Notebooks
It’s quite likely that you have used Jupyter notebooks in the past. They can be a convenient way to test ideas and construct new code. While Jupyter notebooks aren’t the preferred choice for executing long-running code on a cluster (mostly because they are interactive in nature), they can be an important part of your development pipeline.
JupyterHub
A JupyterHub is a way to allow multiple users to access Jupyter notebooks (and other applications) in a way so that each user gets their own isolated environment. This has some similarity to Google’s cloud-based Colab service.
Production Alliance clusters will have ‘jupyterhub’ in the front of the cluster name, e.g.,
- https://jupyterhub.narval.alliancecan.ca
- https://jupyterhub.rorqual.alliancecan.ca
- https://jupyterhub.fir.alliancecan.ca
Other production clusters may use a software called OpenOnDemand that also includes JupterHub functionality, for example:
https://ondemand.sharcnet.ca https://ondemand.scinet.utoronto.ca
Your instructor will give you the URL for the JupyterHub login page (usually putting the address of the training cluster into the URL bar of your browser will get you there).
Once you have arrived at the JupyterHub page, you can log in with the same username and password used to log into the cluster via SSH.

You are now given a page with some options to select some resources, much like a Slurm submission script.
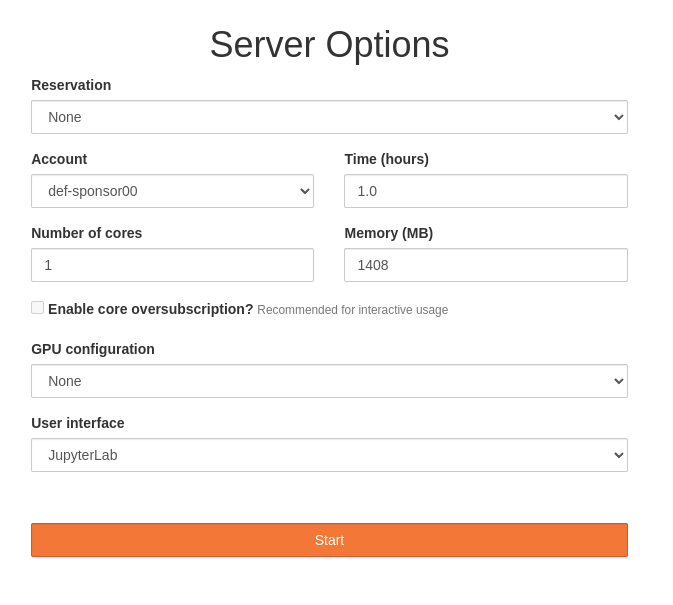
For the most part, we can keep the defaults to get a single core and some memory for an hour. Of particular note is the “JupyterLab” user interface option: Jupyter is a powerful way to run one-or-more notebooks or other applications.
Press “Start”. It may take a few moments for an interface to show up.

On the left side, there is a vertical stack of icons for some general activities:
- File browser (filefolder)
- Running Terminals and Kernels (circle square)
- GPU dashboard
- Table of Contents
- Software
- Extension Manager
You can start a new launcher with the + tab button
Most operations make the launcher disappear, but you can open a new one with the + button
You can start a terminal …
This gives you a terminal session, just like as if you used SSH to access to cluster. The drawback here is that you are doing this through the scheduler, and this way will deplete your priority for running jobs (using SSH to access the cluster will never deplete your priority.
Picking a specific Python version
Select Python 3 (ipykernel) from a launcher.
In the notebook, you can find the current python version a couple of ways:
import sys
sys.version_info
or
!python --version
You can use a specific python version by visiting the software screen (hexagon icon) and
loading the module ipython-kernel/3.11 (for example).
Now on the launcher, the notebook icon says Python 3.11.
In your running notebook, you can now switch python versions through the Kernel
menu (Change Kernel). This will wipe clean any program you are currently running
in the notebook.
Rerun the version code again.
Python scripts as modules
We can load (and run) our prime calculating code …
import primes_cpu
primes_cpu.main()
Another example:
!pip install --no-index pandas scikit-learn numpy
(You may need to restart the kernel first … You may also need to change directories with cd).
import titanic
titanic.main('random_forest')
Some other programs you can access
Some of these don’t work great on our test cluster, but you have access
to some programs by loading other software modules …
After loading the module, press the + on the tab bar to get a new launcher,
you will new icons.
- RStudio: e.g.,
rstudio-server/4.3 - OpenRefine: e.g.,
openrefine/3.4.1 - MS Code Server:
code-server/3.12.0
Quit
Go to File menu and select Logout.
Key Points
Most Alliance clusters have a JupyterHub